In-Depth Analysis of Google Wallet Smart Tap: The Future of Payment Methods
Introduction
Recently, due to work requirements, I’ve been deeply researching Google Wallet Smart Tap related technologies. This technology is changing our understanding and usage of mobile payments.
I wrote this article with two purposes: first, to document my learning experiences for future reference. Second, I hope to help other developers quickly understand the core concepts and implementation methods of this technology.
In this article, I’ll start from basic concepts and gradually introduce how to actually deploy and use Smart Tap technology.
What is NFC
NFC (Near Field Communication) is a short-range wireless communication technology. Simply put, it allows two devices to transfer data at extremely short distances (usually a few centimeters).
The main characteristics of this technology include:
- Ultra-close communication: Effective range is about 4 centimeters, ensuring security
- Low power consumption: Does not heavily consume battery
- Fast connection: Establishing a connection takes less than one second
NFC technology has quite extensive applications in daily life, including mobile payments, transit cards, access cards, and various data exchange applications.
Google Wallet Smart Tap Overview
Smart Tap is a proprietary communication protocol developed by Google based on NFC technology. Its core function is to enable users to conduct fast and secure transactions on supported terminals through their mobile phones.
The advantages of this technology include:
- Fast transactions: Operations can be completed with just a tap on the terminal
- Secure and reliable: Uses encrypted communication protocols
- Convenient to use: No need for additional physical cards
Important Notice: Developer Certification Requirements
If your company wants to develop terminal equipment that supports Smart Tap, you must first pass Google’s certification process. According to the response I received from Google, the complete process is as follows:
If you are a terminal provider and would like to certify your terminal for use with Google Wallet, please provide more details about your terminal, intended functionality and target country/region. The documentation needed for Smart Tap certification is locked behind an NDA.
Once I have this information, my team and I will review and if the decision is to move forward with your request, we will begin the process of onboarding, starting with an NDA.
In short, you need to provide detailed information about your terminal equipment, intended functionality, and target market. Google will decide whether to approve your application based on this information. Once approved, Google will require signing a Non-Disclosure Agreement (NDA), then provide technical documentation.
Before Starting: Prerequisites
Before implementing Smart Tap functionality, we need to meet two basic conditions first. These conditions ensure the entire system can operate normally:
1. Create Digital Pass System
First, you need to establish a complete digital pass architecture, including:
- Pass Class: Defines the basic template and attributes of passes
- Pass Objects: Individual passes actually issued to users
2. Establish Terminal Equipment Partnership
Second, you must establish partnerships with terminal suppliers that support Smart Tap technology.
Currently supported major suppliers include:
- Verifone
- Ingenico
- Pax
- HID
- Equinox
- XAC
- And other Google-certified suppliers
These suppliers can provide compatible hardware equipment and technical support, ensuring your Smart Tap implementation runs smoothly.
Core Identification System: Important ID Concepts
The Smart Tap protocol uses multiple identifiers to manage different entities and permissions. Before starting to create passes, we must first understand these core concepts:
Three key identifiers:
- Redemption Issuer ID: Represents a specific merchant or redemption party
- Collector ID: Terminal equipment identity identifier
- Pass Class ID: Unique identifier for pass categories
Next, we’ll explain the purpose and configuration methods of these identifiers in detail.
Issuer ID
Basic Concept
Issuer ID is the unique identifier for each card issuer in the Google Wallet system. This ID is like your “ID card number” in the Google Wallet ecosystem.
How to Obtain
You can find your Issuer ID in the Google Pay & Wallet Console. This console is the central platform for managing all Google Wallet related services.
Redemption Issuer ID
Role Definition
Redemption Issuer ID is a special type of Issuer ID specifically used to represent “merchants who can redeem passes.” We can understand this with a simple analogy:
- Issuer ID = Shopping mall management company (platform managing multiple merchants)
- Redemption Issuer ID = Individual stores within the shopping mall (merchants actually providing services)
Application Scope
Issuer ID can represent various different entities:
- Individual merchants (such as coffee shops, restaurants)
- Coupon issuers
- Large shopping malls (such as SOGO, Shin Kong Mitsukoshi)
- Terminal manufacturers
ID Format Specifications
When you create pass classes and pass objects, they will be associated with the Redemption Issuer ID. The system uses the following format:
| ID Type | Format | Description |
|---|---|---|
| Class ID | issuerId.classSuffix | classSuffix is a unique value defined by developers for specific pass categories (such as membership levels) |
| Object ID | issuerId.objectSuffix | objectSuffix is a unique value defined by developers for specific pass objects (such as user ID) |
Collector ID
Core Function
Collector ID is the terminal equipment identity identifier and plays a key role in Smart Tap communication processes.
Technical Specifications
- Format: 8-digit ID
- Scope: Each merchant terminal supporting Smart Tap has a dedicated Collector ID
Operation Mechanism
When users bring their phones close to Smart Tap-enabled terminals, the following process occurs:
- Terminal Identification: The terminal sends its Collector ID to the user device
- Key Verification: The user device uses the public key corresponding to that Collector ID for identity verification
- Data Exchange: After successful verification, secure data transmission begins
Important Limitations
Allocation Rules:
- One Issuer ID can only be allocated one set of Collector ID
- Collector ID must be unique throughout the entire system
Pass Class ID
Definition and Purpose
Pass Class ID is used to identify specific pass types or levels, such as different levels of membership cards or different types of coupons.
ID Format
issuerId.classSuffix
Component Explanation
- issuerId: Your issuer ID
- classSuffix: Pass category identifier customized by you
This classSuffix is a unique identifier you design for each pass category. Through this Pass Class, you can create multiple Pass Objects that will inherit the basic attributes of this category.
Permission Management
Ownership Rules:
- Pass Class ID belongs to a single Issuer account
- But can be associated with multiple Redemption Issuers
This means one pass category can be used at multiple merchants, increasing system flexibility.
Smart Tap Communication Process Analysis
The Smart Tap communication mechanism is the core of the entire system. Understanding this process helps you better design and debug your applications.
Basic Communication Principles
The entire communication process can be divided into four stages:
- Terminal Identification Stage: The terminal uses Collector ID to identify itself
- ID Mapping Stage: Collector ID maps to specific Redemption Issuer ID
- Pass Search Stage: When Smart Tap is triggered, the terminal sends Collector ID to the user device
- Pass Transmission Stage: Google Wallet App searches for matching passes and returns them to the terminal
Detailed Processing Flow
When users bring their phones close to terminals:
- Terminal Broadcast: The terminal sends its Collector ID
- App Retrieval: Google Wallet App scans all passes stored in the device
- Matching Verification: System compares the pass’s Pass Class ID with the terminal’s Collector ID
- Result Return: After finding matching passes, the app sends relevant pass information to the terminal
This design ensures only authorized passes can be used on corresponding terminals, greatly enhancing system security.
Case Study 1: Single Merchant Model
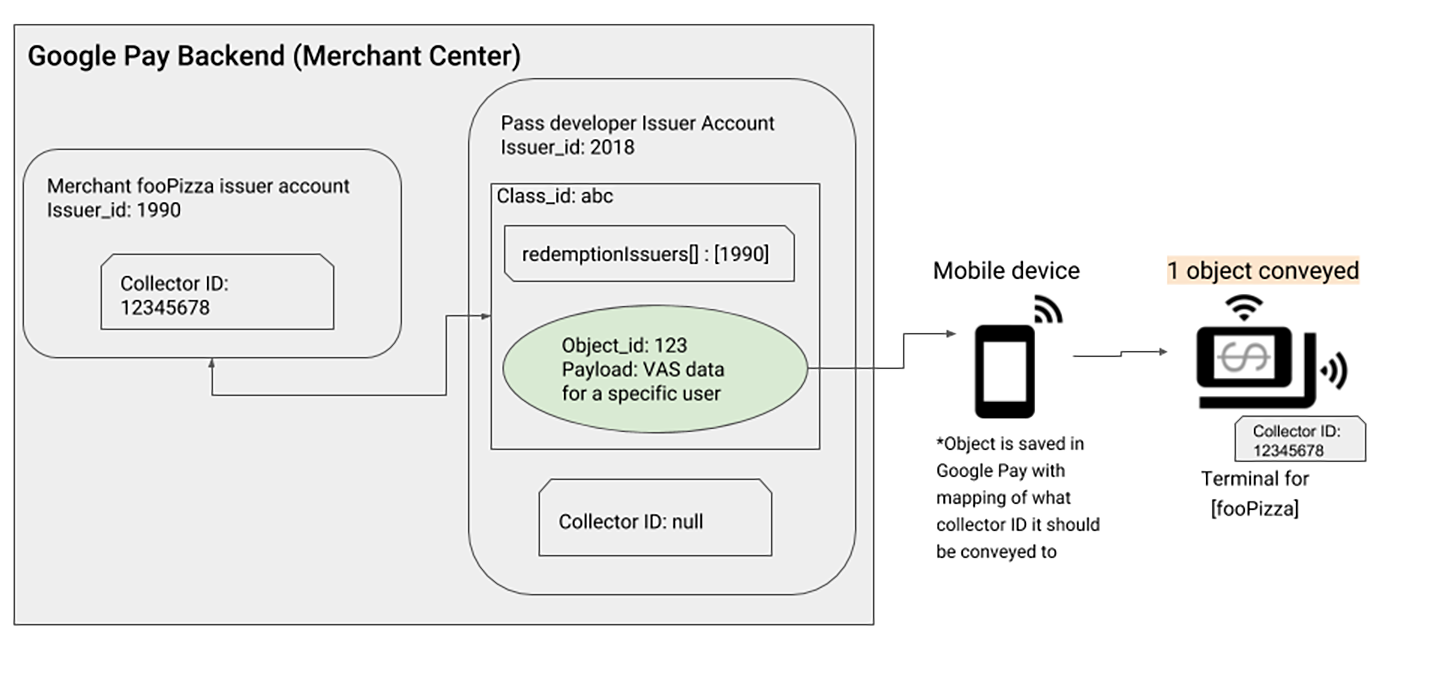
Scenario Description
This case demonstrates the most common Smart Tap deployment model: a pass development platform serving a single merchant.
Role Analysis
In this example, there are two different participants:
- Issuer
2018: Pass developer (playing Aggregator role) - Issuer
1990: fooPizza restaurant (playing Redemption Issuer role)
Implementation Steps
Assuming fooPizza wants to enable Smart Tap functionality in their store, here’s the complete setup process:
| Step | Responsible Role | Specific Operations |
|---|---|---|
| 1 | Aggregator | Create pass structure: Create pass class (Class ID: abc) and pass object (Object ID: 123) |
| 2 | Aggregator | Set redemption permissions: Add fooPizza’s Issuer ID (1990) to the redemptionIssuers attribute in the pass class |
| 3 | Redemption Issuer | Obtain device identifier: Apply to Google and obtain dedicated Collector ID (example: 12345678) |
| 4 | Redemption Issuer | Configure terminal equipment: Set Collector ID 12345678 on all Smart Tap-enabled card readers in the store |
Operation Results
After setup completion, any passes that simultaneously meet the following conditions will operate smoothly on fooPizza’s terminals:
- Pass Class ID is
abc - Terminal Collector ID is
12345678
This ensures only authorized passes can be used at designated merchants.
Case Study 2: Multi-Merchant Alliance Model
Application Scenario
This case demonstrates a more advanced deployment model: one pass category can be used at multiple different merchants. This architecture is particularly suitable for:
- Unified membership card systems in shopping malls
- Multi-store integration for chain brands
- Shared coupons for alliance merchants
Important Concept
In multi-merchant mode, the core principle is: “One Pass Class can correspond to multiple Redemption Issuers.” For specific merchants to be able to redeem passes, that merchant’s Redemption Issuer ID must be added to the redemptionIssuers attribute when creating the Pass Class.
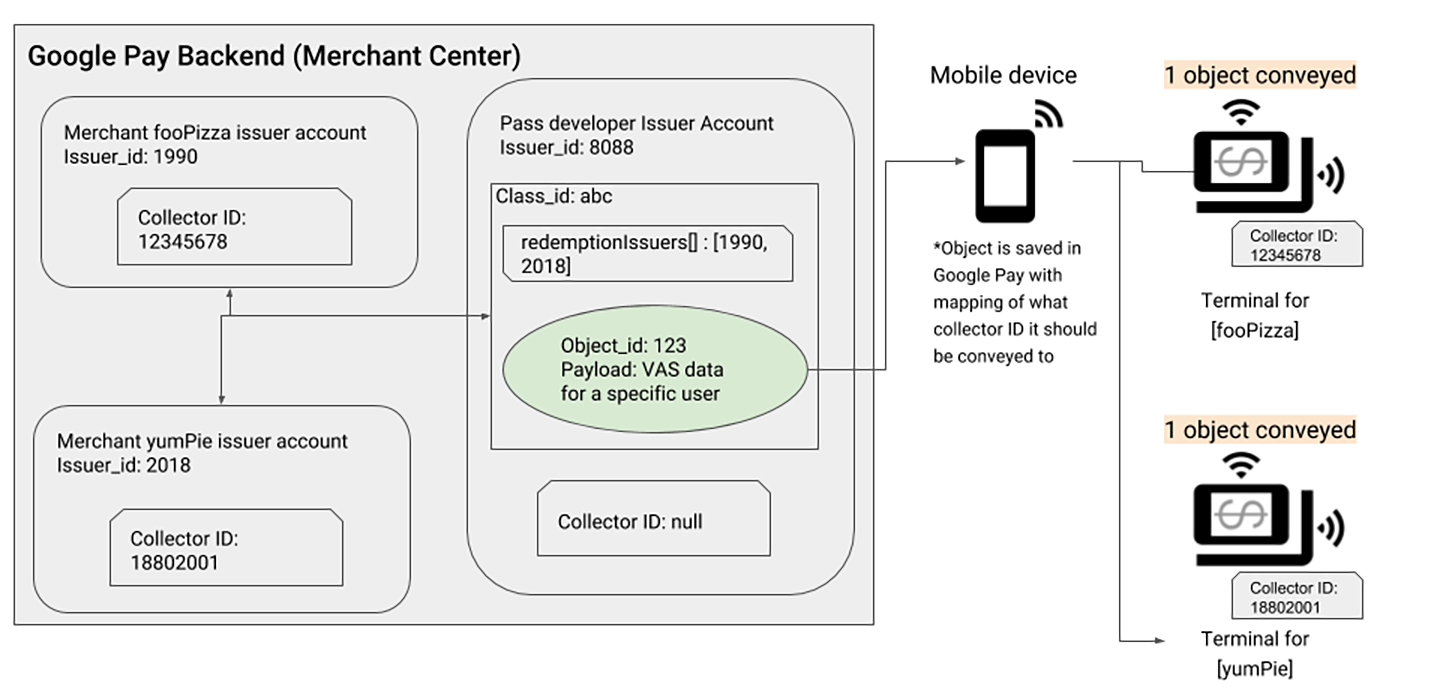
Role Analysis
This example involves three different participants:
- Issuer
8088: Pass development platform (Aggregator) - Issuer
1990: fooPizza restaurant (Redemption Issuer) - Issuer
2018: yumPie bakery (Redemption Issuer)
Setup Process
To allow the same pass to be used at two different stores, the following steps need to be completed:
| Step | Responsible Role | Specific Operations |
|---|---|---|
| 1 | Aggregator | Create shared pass: Create pass class (Class ID: abc) and pass object (Object ID: 123) |
| 2 | Aggregator | Authorize multiple merchants: Add both stores’ IDs (1990 and 2018) to the redemptionIssuers attribute |
| 3 | Redemption Issuer | Each obtains ID: fooPizza gets Collector ID 12345678, yumPie gets Collector ID 18802001 |
| 4 | Redemption Issuer | Configure terminals per store: Each store configures their dedicated Collector ID on their terminal equipment |
System Operation Logic
After setup completion, users holding passes with Class ID abc can use them at both stores:
- At fooPizza: Terminal Collector ID
12345678will identify and accept the pass - At yumPie: Terminal Collector ID
18802001will also identify and accept the pass
This architecture greatly enhances pass usage flexibility while maintaining terminal independence for each merchant.
Case Study 3: Self-Development Model (No Intermediary Platform)
Application Scenario
This case demonstrates the most streamlined deployment model: merchants develop and manage their own pass systems without needing third-party platform agents. This model is particularly suitable for:
- Large enterprises with technical teams
- Merchants who want complete control over their pass systems
- Independent businesses that don’t need integration with other merchants
Core Features
In this model, the developer and redemption party are the same entity. In other words, “I develop the passes, I use them myself.” This simplifies permission management and communication processes.
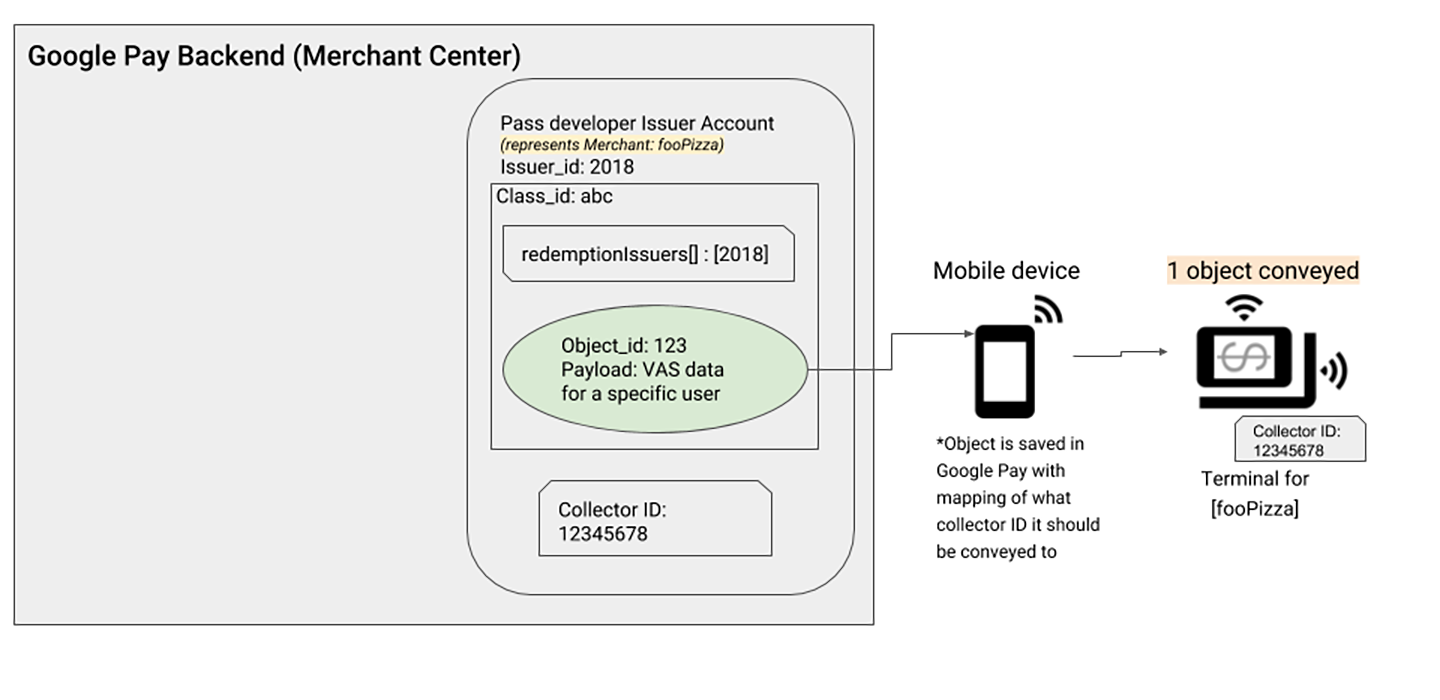
Role Integration
In this example, there’s only one main participant:
- Issuer
2018: Plays both the role of pass developer and Redemption Issuer
Implementation Process
Since the developer is the user, the setup process becomes relatively simple:
| Step | Responsible Role | Specific Operations |
|---|---|---|
| 1 | Pass Developer | Create pass system: Create pass class (Class ID: abc) and pass object (Object ID: 123) |
| 2 | Pass Developer | Self-authorization: Add own Issuer ID (2018) to the redemptionIssuers attribute |
| 3 | Pass Developer | Apply for device ID: Apply to Google and obtain Collector ID (example: 12345678) |
| 4 | Pass Developer | Configure own terminals: Configure Collector ID 12345678 on all own Smart Tap terminal equipment |
Advantages and Considerations
Main advantages of this model:
- Simplified management: No need to coordinate with other roles
- Complete control: Absolute control over the pass system
- Rapid deployment: Reduced communication costs, faster time to market
Factors to consider:
- Technical threshold: Need complete development and maintenance capabilities
- Scalability: If future collaboration with other merchants is desired, system re-architecture may be needed
User Experience and Behavioral Patterns
The Smart Tap user experience varies according to the user’s current interaction with the Google Wallet app. Understanding these behavioral patterns helps design better user experiences.
The system intelligently decides which pass information to send to terminal devices based on the user’s operational state.
Usage Scenario 1: Actively Select Specific Pass
Usage Process
This is the most direct usage method where users clearly know which pass they want to use:
| Step | Operating Role | Detailed Description |
|---|---|---|
| 1 | User | Select pass: Actively choose the specific pass to use in the Google Wallet app |
| 2 | User | Execute Smart Tap: Bring phone close to Smart Tap-enabled contactless card reader |
| 3 | Terminal | Verify and respond: System checks if Collector ID matches, decides whether to send pass |
System Behavior Logic
- ID Match Success: Pass is successfully sent to terminal, transaction completed
- ID Mismatch: Pass is not sent, protecting system security
Important Notice
Pass Validity Check: As long as the Collector ID matches, the system will send the pass even if the pass may have expired. This means pass validity checking is primarily handled by the terminal equipment.
Usage Scenario 2: Operations from Home Screen or Lock Screen
Usage Process
In this situation, users haven’t pre-selected a specific pass, so the system needs to make intelligent judgments:
| Step | Operating Role | Detailed Description |
|---|---|---|
| 1 | User | Ready state: Stay on Google Wallet home screen or in lock screen state |
| 2 | User | Execute Smart Tap: Bring phone close to Smart Tap-enabled contactless card reader |
| 3 | Terminal | Smart selection: System adopts different processing strategies based on available passes |
System Smart Judgment Mechanism
The system adopts different strategies based on matching results:
- Single Match: If only one pass’s Collector ID matches the terminal, directly send that pass
- Multiple Matches: If multiple passes meet criteria, the system will:
- Display pass selection interface
- Let user choose from valid passes
- Send the user’s final selected pass
This design ensures users still get a good experience even in complex situations.
System Setup Tutorial: Building Smart Tap from Scratch
Now let’s enter the implementation phase. This section will detail how to set up a complete Smart Tap system from scratch.
Step 1: Enable Google Wallet API
Why is this step needed?
Google Wallet API is the foundation of the entire Smart Tap system. Without enabling this API, your application cannot communicate with Google Wallet services.
Operation Steps
-
Log in to management platform: Go to Google Cloud Console and log in with your Google account
- Create or select project:
- If you don’t have a Google Cloud project yet, please create a new project
- Detailed steps can be found in Google Official Documentation
- Enable API service:
- Go to Google Wallet API page
- Click the “Enable” button
- ※ This API is sometimes also called “Google Pay for Passes API”
Step 2: Create Service Account and Keys
Basic Concept Explanation
Before starting, let’s understand some key concepts:
- Service Account: This is your application’s identity proof in Google’s system
- Service Account Key: File containing private keys, used to prove your application’s identity
- Importance: This key file is extremely sensitive, please keep it safe and avoid leakage
Why do we need Service Account?
When your application calls Google Wallet API, Google needs to verify the caller’s identity. Service Account is the core of this identity verification mechanism.
Step 2-1: Create Service Account
Operation Process
- Enter service account page:
- In Google Cloud Console, go to Service Accounts page
- Fill in account information:
- Service account name: Recommend using meaningful names like “wallet-smart-tap-service”
- Service account ID: System will auto-generate, you can also modify it
- Description: Brief description of this account’s purpose, such as “For Google Wallet Smart Tap API access”
- Complete creation:
- Click “CREATE AND CONTINUE”
- Click “DONE” to complete creation
Step 2-2: Generate Service Account Key
Operation Process
-
Select account: In the service account list, click the service account you just created
-
Enter key management: Click the “KEYS” tab
- Create new key:
- Click “ADD KEY”
- Select “Create new key”
- Select format:
- Choose “JSON” format (this is the recommended format)
- Click “CREATE”
- Save key file:
- System will automatically download the JSON file
- Please store this file in a secure location
Step 2-3: Set Environment Variables
Why do we need environment variables?
The GOOGLE_APPLICATION_CREDENTIALS environment variable tells Google SDK where to find your service account key file. This is Google Cloud’s officially recommended authentication method.
Setup Method
- Reference official documentation:
- Please follow Google Cloud Official Guide to set environment variables
- Actual operation:
- Execute the following command in terminal (please modify file path):
export GOOGLE_APPLICATION_CREDENTIALS="/Users/nickhuang/Documents/wallet_serviceaccount_key.json" - Permanent setup:
- To make it permanently effective, add the above command to
.bashrcor.zshrcfile
- To make it permanently effective, add the above command to
- Verify setup:
- Execute the following command to confirm successful setup:
echo $GOOGLE_APPLICATION_CREDENTIALS
- Execute the following command to confirm successful setup:
Step 2-4: Authorize Service Account
Final step: Grant permissions
After creating the service account, you still need to grant it permissions to manage passes in the Google Wallet system.
Operation Steps
-
Open Wallet console: Go to Google Pay & Wallet Console
-
Enter user management: Click “Users” option
- Invite service account:
- Click “Invite a user”
- Enter the service account’s email address (format usually:
your-service-name@your-project.iam.gserviceaccount.com)
- Set permission level:
- Select “Developer” or “Admin” from the “Access level” dropdown
- Developer: Suitable for general development needs
- Admin: Suitable for situations requiring full management permissions
- Complete invitation: Click “Invite”
Step 3: Issuer Account Setup
Now we’ll set up the Issuer account, which is the central control center for managing all pass classes and objects.
Create New Issuer Account
Setup Process
-
Open management console: Go to Google Pay & Wallet Console
- Create issuer account:
- Follow the on-screen instructions to complete account creation step by step
- The system will guide you through filling in necessary information
-
Select service type: Choose “Google Wallet API”
-
Confirm terms: Carefully read and confirm you understand the service terms and privacy policy
- Record important information:
- Copy Issuer ID: This is your account’s unique identifier, please store it in a secure place
- This ID will be used in all subsequent code
- Set up test environment:
- Under the “Manager” tab, select “Set up test accounts”
- Add email addresses you want to participate in testing
- These accounts will be able to use the passes you develop during the testing phase
Upload Public Key
Important Notice
Before starting, you need to understand a potential order problem:
Chicken and egg problem: Some terminal suppliers might require you to provide Collector ID first before they give you Public Key. But to generate Collector ID, you need to upload Public Key first.
Solution: You can first use the demonstration key provided below to generate Collector ID, then replace the demonstration key after the terminal supplier provides the actual public key.
Demonstration Public Key
Here’s a public key for testing:
-----BEGIN PUBLIC KEY-----
MFkwEwYHKoZIzj0CAQYIKoZIzj0DAQcDQgAEchyXj869zfmKhRi9xP7f2AK07kEo
4lE7ZlWTN14jh4YBTny+hRGRXcUzevV9zSSPJlPHpqqu5pEwlv1xyFvE1w==
-----END PUBLIC KEY-----
Code for Uploading Key
🗂️ [add_a_smart_tap_key.js] - Script for uploading public key
const { GoogleAuth } = require("google-auth-library");

// Set file path and base URL
const keyFilePath = process.env.GOOGLE_APPLICATION_CREDENTIALS || "/path/to/key.json";
const baseUrl = "https://walletobjects.googleapis.com/walletobjects/v1";
const credentials = require(keyFilePath);

// Create HTTP client for API calls
const httpClient = new GoogleAuth({
  credentials: credentials,
  scopes: "https://www.googleapis.com/auth/wallet_object.issuer",
});

(async () => {
  /**
   * Add public key to Issuer account
   *
   * @param {string} issuerId Your Issuer ID
   */
  async function addSmartTapKey(issuerId) {
    // Prepare key data to upload
    let patchBody = {
      smartTapMerchantData: {
        authenticationKeys: [
          {
            id: 1, // Key ID
            publicKeyPem:
              "-----BEGIN PUBLIC KEY-----\nMFkwEwYHKoZIzj0CAQYIKoZIzj0DAQcDQgAEchyXj869zfmKhRi9xP7f2AK07kEo\n4lE7ZlWTN14jh4YBTny+hRGRXcUzevV9zSSPJlPHpqqu5pEwlv1xyFvE1w==\n-----END PUBLIC KEY-----",
          },
        ],
      },
    };

    try {
      // Send PATCH request to update Issuer settings
      let response = await httpClient.request({
        url: `${baseUrl}/issuer/${issuerId}`,
        method: "PATCH",
        data: patchBody,
      });

      console.log("✅ Public key uploaded successfully");
      console.log(response);
    } catch (err) {
      console.error("❌ Error occurred while uploading public key:", err);
    }
  }

  // 🔧 Please replace "Your issuer ID" below with your actual Issuer ID
  let issuerId = "Your issuer ID";
  await addSmartTapKey(issuerId);
})();
Execute Script
Run the following command in terminal:
node add_a_smart_tap_key.js
Confirm Results
After successful upload, you can confirm in Google Pay & Wallet Console:
- Go to “Google Wallet API” → “Other Features”
- You’ll see the public key has been successfully uploaded
- The system will automatically generate corresponding Collector ID
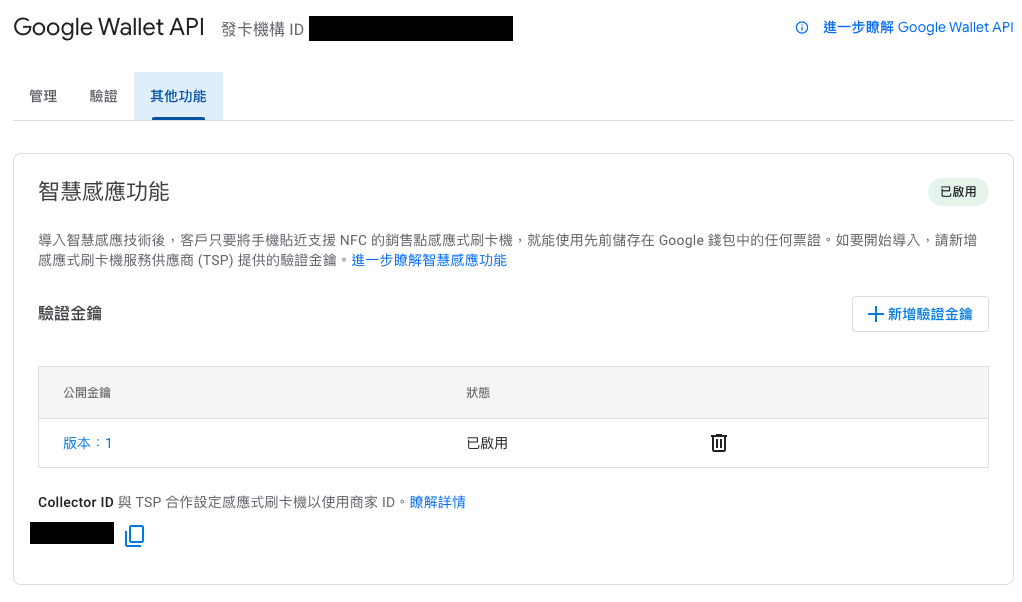
Get Collector ID
After uploading the public key, the system will automatically generate a Collector ID. You can obtain this important identifier programmatically.
🗂️ [get_collector_id.js] - Script to get Collector ID
const { GoogleAuth } = require("google-auth-library");

// 🔧 Please replace "Your issuer ID" below with your actual Issuer ID
let issuerId = "Your issuer ID";
const keyFilePath = process.env.GOOGLE_APPLICATION_CREDENTIALS || "/path/to/key.json";

const baseUrl = "https://walletobjects.googleapis.com/walletobjects/v1";

const credentials = require(keyFilePath);

// Create authentication client
const httpClient = new GoogleAuth({
  credentials: credentials,
  scopes: "https://www.googleapis.com/auth/wallet_object.issuer",
});

/**
 * Get Collector ID from Issuer account
 *
 * @param {string} issuerId Your Issuer ID
 * @returns {string} Collector ID
 */
async function getCollectorId(issuerId) {
  try {
    // Request Issuer information from Google API
    let response = await httpClient.request({
      url: `${baseUrl}/issuer/${issuerId}`,
      method: "GET",
    });

    console.log("📋 Issuer account information:");
    console.log(response);

    // Extract Collector ID from response
    return response.data.smartTapMerchantData.smartTapMerchantId;
  } catch (error) {
    console.error("❌ Error occurred while getting Collector ID:", error);
    throw error;
  }
}

// Execute function and display results
getCollectorId(issuerId)
  .then((collectorId) => {
    console.log("✅ Successfully obtained Collector ID:", collectorId);
  })
  .catch((error) => {
    console.error("💥 Failed to get Collector ID:", error);
  });
Execute Script
node get_collector_id.js
Expected Results
If everything is set up correctly, you’ll see output similar to the following:
✅ Successfully obtained Collector ID: 12345678
This 8-digit Collector ID will be used to configure your terminal equipment.
Step 4: Merchant Configuration Setup
This stage involves merchant-side setup work, including coordination with terminal suppliers and actual equipment configuration.
Information to Prepare
Before starting merchant setup, please ensure you have prepared the following information:
- Specific merchant’s Issuer Account ID
- Redemption Issuer ID to enable Smart Tap functionality
- Pass classes that have completed Smart Tap setup
Merchant Setup Process
Complete Setup Steps
Here’s the complete process for merchants to enable Smart Tap functionality:
Step 1: Coordinate with Terminal Supplier
- Request public key and key version from contactless card reader supplier
- If supplier requires you to provide Collector ID first, complete the aforementioned issuer setup steps to generate Collector ID
Step 2: Provide Collector ID
- Provide the Collector ID you obtained to the contactless card reader supplier
- Supplier will use this ID to configure their terminal equipment
Step 3: Merchant Information Delivery Provide the following key information to merchants:
- Redemption Issuer ID: Merchant’s unique identifier
- Google Pay & Wallet Console Link: Convenient for merchants to manage and view
- Collector ID: Identifier needed for terminal equipment configuration
Step 4: Long-term Data Preservation Remind merchants to permanently preserve Redemption Issuer ID and Collector ID. This information will still be needed when adding new pass classes in the future.
Terminal Equipment Configuration
Supplier Responsibility
Contactless card reader suppliers are responsible for configuring the following parameters for all merchant terminal equipment:
Required Configuration Items
- Collector ID: Unique identifier for equipment
- Key Version: Key version number
- Private Key: Private key paired with public key
Advantages After Configuration Completion
After terminal equipment completes Smart Tap configuration, you can:
- Enable any pass class on that merchant’s card readers
- No additional terminal settings needed when adding more pass class support
- Enjoy flexible pass management system
This design gives the system good scalability - merchants only need to configure terminals once to support multiple different pass types.
Step 5: Pass System Configuration
Now we enter the core configuration stage of the pass system. This includes creating Pass Classes and Pass Objects.
Pass Class Configuration
Core Configuration Requirements
To make pass classes support Smart Tap functionality, you must set two key attributes:
Required Attribute Settings
-
enableSmartTap: Set totrueto enable Smart Tap functionality -
redemptionIssuers: Array containing all Redemption Issuer IDs that can redeem this class of passes
Importance of Settings
These two settings determine:
- Whether passes can be used through Smart Tap
- Which merchant terminals can accept this class of passes
Complete Code for Creating Loyalty Card Pass Class
The following example demonstrates how to create a loyalty card pass class that supports Smart Tap:
const { GoogleAuth } = require("google-auth-library");

// 🔧 Set your basic information
let issuerId = "Your issuer ID"; // Your Issuer ID
let classSuffix = "Your classSuffix"; // Pass class suffix (custom)
const classId = `${issuerId}.${classSuffix}`; // Complete pass class ID
const keyFilePath = process.env.GOOGLE_APPLICATION_CREDENTIALS || "/path/to/key.json";

// Google Wallet API base URL
const baseUrl = "https://walletobjects.googleapis.com/walletobjects/v1";

// Load service account credentials
const credentials = require(keyFilePath);

// Create HTTP client
const httpClient = new GoogleAuth({
  credentials: credentials,
  scopes: "https://www.googleapis.com/auth/wallet_object.issuer",
});

// Create loyalty card pass class supporting Smart Tap
let loyaltyClass = {
  id: `${classId}`,
  issuerName: "Climax technology",
  programName: "Climax Loyalty SmartTap 2 Program Test",

  // ⭐ Core Smart Tap settings
  enableSmartTap: true, // Enable Smart Tap functionality
  redemptionIssuers: [
    // List of merchant IDs that can redeem this pass
    "Your Redemption issuer ID", // 🔧 Please replace with actual Redemption Issuer ID
  ],

  reviewStatus: "underReview", // Review status
  // Loyalty program logo settings
  programLogo: {
    sourceUri: {
      uri: "https://www.sourcesecurity.com/img/companies/300/climax-logo_1560425415.jpg",
    },
    contentDescription: {
      defaultValue: {
        language: "en-US",
        value: "Program Logo",
      },
    },
  },
  // Text modules: Text messages displayed on membership card
  textModulesData: [
    {
      header: "Welcome to Your Loyalty SmartTap 2 Program",
      body: "Thank you for joining our loyalty SmartTap 2 program. Enjoy exclusive rewards and benefits.",
      id: "welcome_message",
    },
  ],
  // Link modules: Provide related links on membership card
  linksModuleData: {
    uris: [
      {
        uri: "https://www.climax.com.tw/",
        description: "Visit our loyalty SmartTap 2 program",
        id: "website",
      },
    ],
  },
  // Image modules: Image elements on membership card
  imageModulesData: [
    {
      mainImage: {
        sourceUri: {
          uri: "https://www.sourcesecurity.com/img/companies/300/climax-logo_1560425415.jpg",
        },
        contentDescription: {
          defaultValue: {
            language: "en-US",
            value: "Loyalty SmartTap 2 Program Banner",
          },
        },
      },
      id: "loyalty_banner",
    },
  ],
  // Message modules: Messages that can be pushed to users
  messages: [
    {
      header: "Welcome",
      body: "Thanks for joining our loyalty SmartTap 2 program!",
      id: "welcome_message",
    },
  ],
};

// Check if pass class already exists
httpClient
  .request({
    url: `${baseUrl}/loyaltyClass/${classId}`,
    method: "GET",
  })
  .then((response) => {
    console.log("✅ Pass class already exists");
    console.log(response);

    console.log("🏷️ Pass Class ID:");
    console.log(response.data.id);
  })
  .catch((err) => {
    if (err.response && err.response.status === 404) {
      // Pass class doesn't exist, create a new one
      console.log("📝 Creating new pass class...");

      httpClient
        .request({
          url: `${baseUrl}/loyaltyClass`,
          method: "POST",
          data: loyaltyClass,
        })
        .then((response) => {
          console.log("✅ Pass class created successfully!");
          console.log(response);

          console.log("🏷️ New pass class ID:");
          console.log(response.data.id);
        })
        .catch((createErr) => {
          console.error("❌ Failed to create pass class:", createErr);
        });
    } else {
      // Other errors
      console.error("❌ Unknown error occurred:", err);
    }
  });
Pass Object Configuration
Core Configuration Requirements
For Pass Objects, Smart Tap functionality requires setting one key attribute:
Required Attribute
-
smartTapRedemptionValue: The value sent to the terminal when the pass is used through Smart Tap
Purpose Explanation
This value can represent:
- Loyalty points balance
- Coupon value
- Remaining pass uses
- Other business logic-related values
Complete Code for Creating Pass Object
const { GoogleAuth } = require("google-auth-library");
const jwt = require("jsonwebtoken");

// 🔧 Set your basic information
let issuerId = "Your issuer ID"; // Your Issuer ID
let classSuffix = "Your classSuffix"; // Use previously created pass class ID
let objectSuffix = "Your objectSuffix"; // Pass object suffix (usually user ID)
const objectId = `${issuerId}.${objectSuffix}`; // Complete pass object ID
const keyFilePath = process.env.GOOGLE_APPLICATION_CREDENTIALS || "/path/to/key.json";

// Google Wallet API base URL
const baseUrl = "https://walletobjects.googleapis.com/walletobjects/v1";

// Load service account credentials
const credentials = require(keyFilePath);

// Create HTTP client
const httpClient = new GoogleAuth({
  credentials: credentials,
  scopes: "https://www.googleapis.com/auth/wallet_object.issuer",
});

// Create loyalty card pass object supporting Smart Tap
let loyaltyObject = {
  id: `${objectId}`, // Pass object unique ID
  classId: `${issuerId}.${classSuffix}`, // Corresponding pass class ID
  state: "active", // Pass status: active
  accountId: "123", // User account ID
  accountName: "Nick Huang", // User name
  // Text modules: Display loyalty points information
  textModulesData: [
    {
      header: "Your Loyalty Points",
      body: "You have 500 points.",
      id: "loyalty_points",
    },
  ],
  // Geographic location settings (optional)
  locations: [
    {
      latitude: 37.422, // Latitude
      longitude: -122.084, // Longitude
    },
  ],

  // ⭐ Smart Tap core setting: redemption value
  smartTapRedemptionValue: "500", // Value sent when using Smart Tap (500 points here)
  // Info modules: Display additional pass information
  infoModuleData: {
    labelValueRows: [
      {
        columns: [
          {
            label: "Smart Tap ID",
            value: "1234567890",
          },
        ],
      },
    ],
  },
};

// Check if pass object already exists
httpClient
  .request({
    url: `${baseUrl}/loyaltyObject/${objectId}`,
    method: "GET",
  })
  .then((response) => {
    console.log("✅ Pass object already exists");
    console.log(response);

    console.log("🏷️ Pass Object ID:");
    console.log(response.data.id);
  })
  .catch((err) => {
    if (err.response && err.response.status === 404) {
      // Pass object doesn't exist, create a new one
      console.log("📝 Creating new pass object...");

      httpClient
        .request({
          url: `${baseUrl}/loyaltyObject`,
          method: "POST",
          data: loyaltyObject,
        })
        .then((response) => {
          console.log("✅ Pass object created successfully!");
          console.log(response);

          console.log("🏷️ New pass object ID:");
          console.log(response.data.id);

          // Generate "Add to Google Wallet" link
          generateAddToWalletLink(objectId);
        })
        .catch((createErr) => {
          console.error("❌ Failed to create pass object:", createErr);
        });
    } else {
      // Other errors
      console.error("❌ Unknown error occurred:", err);
    }
  });

/**
 * Generate "Add to Google Wallet" link
 * Users can add passes to their Google Wallet through this link
 */
function generateAddToWalletLink(objectId) {
  // Create JWT payload
  const payload = {
    iss: credentials.client_email, // Service account email
    aud: "google", // Target audience
    origins: ["http://localhost:3000"], // Allowed domains
    typ: "savetowallet", // Mark as "save to wallet" type
    payload: {
      loyaltyObjects: [
        // Loyalty card object list
        {
          id: objectId,
        },
      ],
    },
  };

  // Sign JWT using RS256 algorithm
  const token = jwt.sign(payload, credentials.private_key, {
    algorithm: "RS256",
  });

  // Combine into complete "Add to Google Wallet" link
  const addToWalletLink = `https://pay.google.com/gp/v/save/${token}`;

  console.log("🔗 Add to Google Wallet link:");
  console.log(addToWalletLink);
}
Usage Instructions
After execution, you’ll get a JWT token. Fill this token into the following URL format:
https://pay.google.com/gp/v/save/{JWT}
After users click this link, they can add the pass you created to their Google Wallet.
Step 6: Actual Testing and Demonstration
Now let’s test whether the entire Smart Tap system is working normally.
Download Test Application
Get Testing Tool
- Download Google’s official Smart Tap Sample App
- This application can simulate merchant card reader terminals
Configure Test Environment
- Modify Collector ID:
- Open sample code
- Replace the Collector ID with the one you obtained earlier
- This way your phone will recognize this application as your merchant terminal
- Prepare test passes:
- Ensure your phone has installed the passes created earlier
- Pass status is “active”
Testing Steps
- Launch test application: Run the modified Smart Tap Sample App on another device
- Open Google Wallet: Open the Google Wallet app on your phone
- Execute Smart Tap: Bring your phone close to the device running the test application
- Confirm results: Observe whether the pass is successfully transmitted to the test terminal
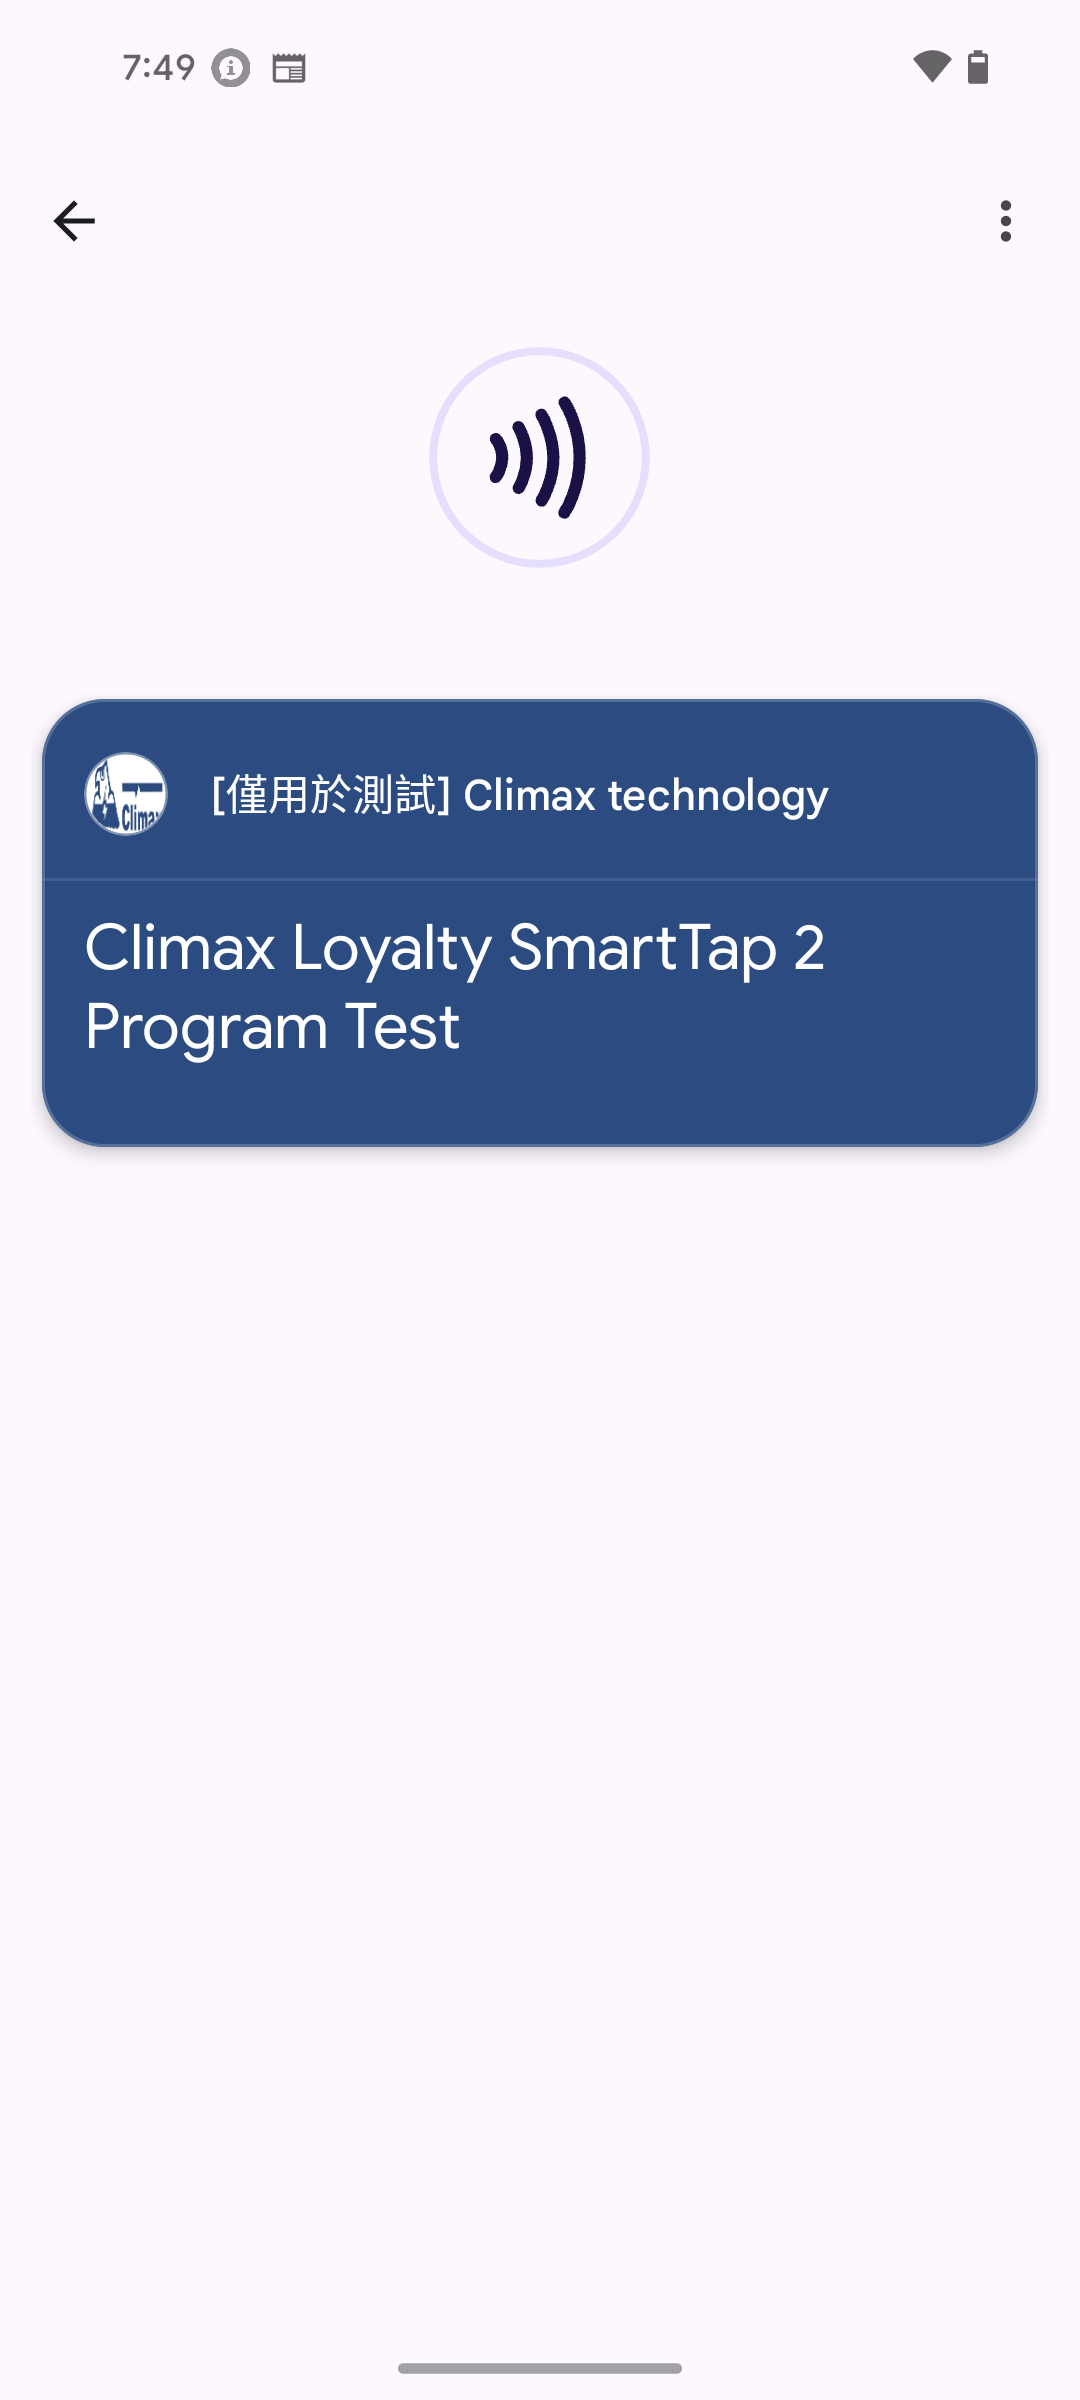
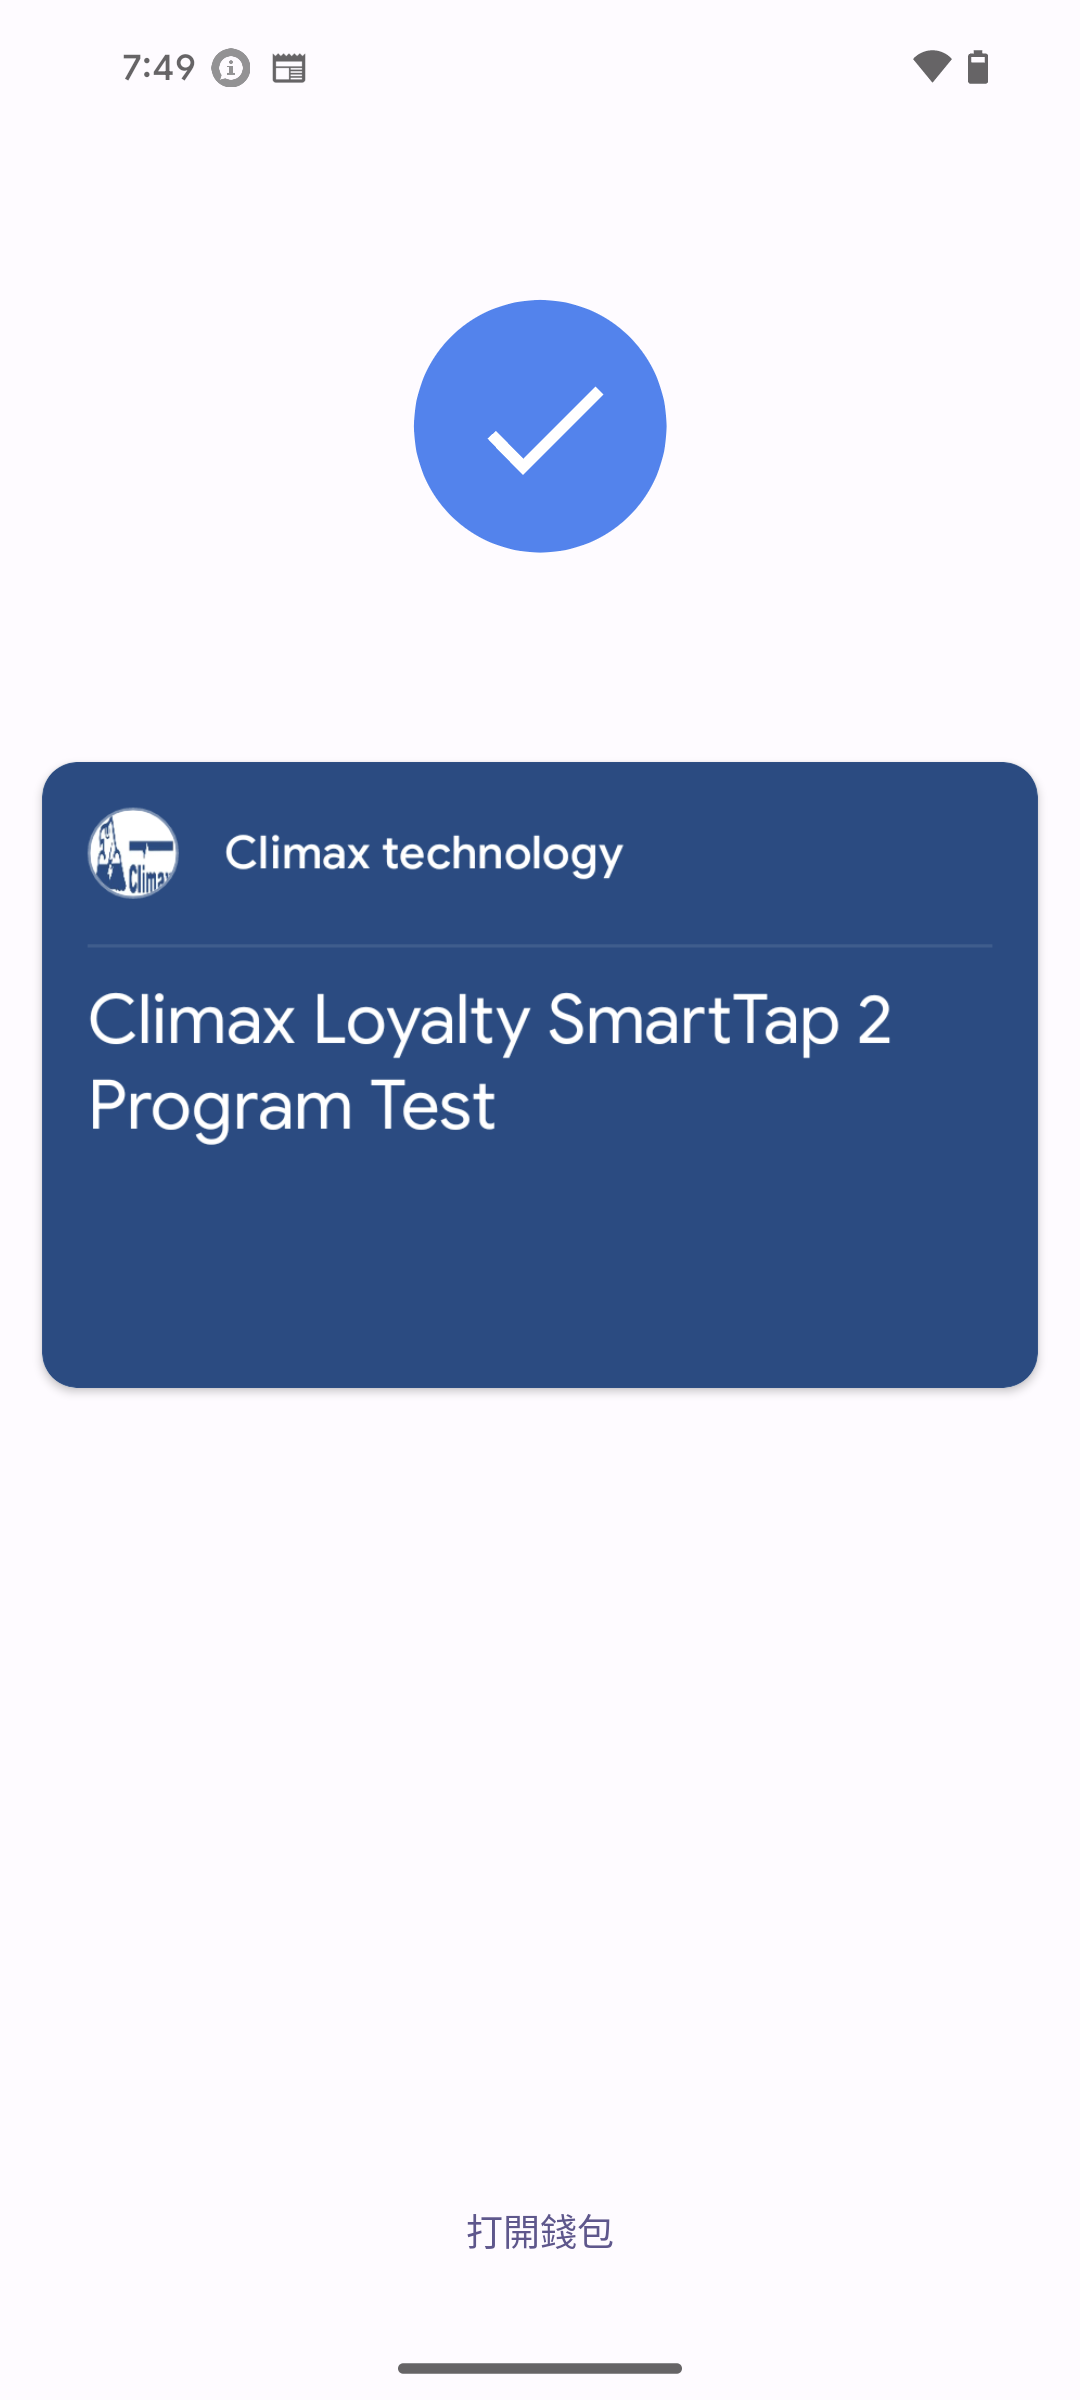
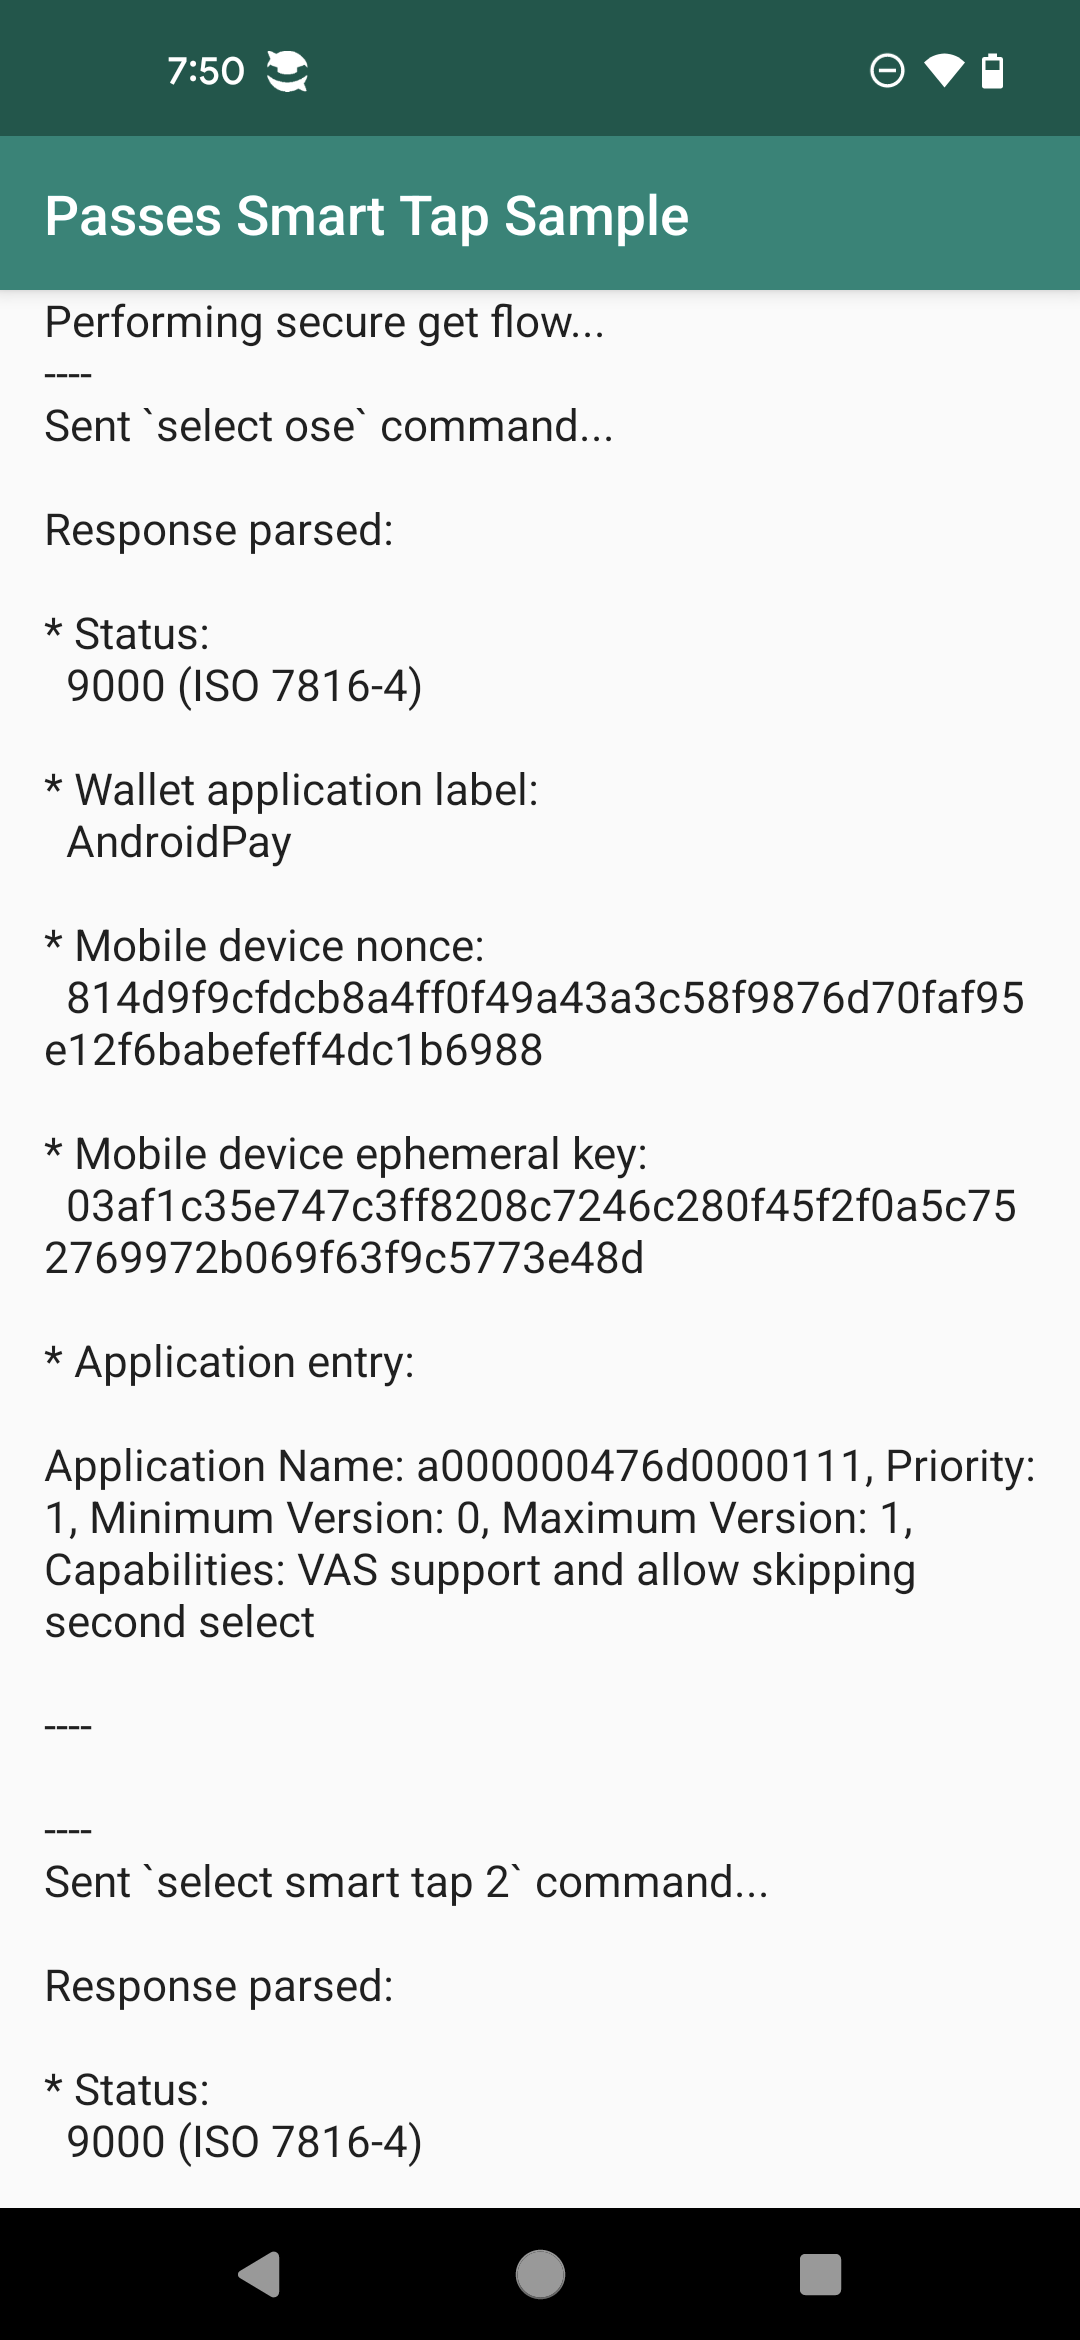
Successful Test Screenshots
Here are actual screenshots when Smart Tap executes successfully:
Indicators of Test Success
When you see the above screens, it indicates your Smart Tap system is working successfully:
- Phone successfully identifies terminal’s Collector ID
- Pass data is smoothly transmitted to terminal application
-
smartTapRedemptionValueis correctly displayed on terminal
Summary
Through this article’s detailed introduction, we’ve completely understood all aspects of Google Wallet Smart Tap technology:
Technical Architecture Understanding
- Basic principles of NFC near field communication
- Smart Tap protocol communication mechanisms
- Roles and relationships of various ID systems
Implementation Capability Building
- Complete system setup process
- Methods for creating pass classes and objects
- Specific steps for testing and verification
Business Application Value
- Supports various business models (single merchant, multi-merchant alliance, self-development)
- Provides flexible pass management systems
- Creates convenient payment experiences for users
Smart Tap technology is not just a technical implementation; it represents the future direction of mobile payments. With the popularization of NFC technology and consumers’ increasing demand for convenience, these technologies will play increasingly important roles in our daily lives.
Extended Learning Resources
- Smart Tap overview - Google official technical overview
- Smart tap sample app - Official test application
- Google Pay & Wallet Console - Management console
- Create passes on Android using the Google Wallet API - Android implementation tutorial
- Create passes on Web using the Google Wallet API - Web implementation tutorial
Discussion and Communication
If you encounter any problems during implementation, or have different thoughts and suggestions, please feel free to leave comments or send me an email. Technology progresses through mutual communication and sharing - let’s explore and learn this exciting technological field together!
Enjoy Reading This Article?
Here are some more articles you might like to read next: