Complete iOS Network Packet Capture Tutorial: Using rvictl and Wireshark Debugging Techniques
Introduction
In our previous article, we explored how to capture network packets on Android. This time, we’ll focus on network packet capture methods for the iOS platform.
Compared to Android’s complex process requiring root permissions, iOS packet capture is relatively straightforward. However, developers attempting this for the first time may still encounter challenges with permission settings or interface operations.
This tutorial will guide you step-by-step through the complete iOS network packet capture process. Whether you’re working on IoT development, debugging app connectivity issues, or analyzing network traffic, these techniques will become invaluable tools in your arsenal.
Prerequisites
Before getting started, please ensure you have the following essential tools prepared:
Hardware Requirements:
- An iOS device (iPhone or iPad)
- A USB cable
- A Mac computer
Software Requirements:
-
rvictltool (Remote Virtual Interface, usually included after installing Xcode) - Wireshark packet analysis tool
Note:
rvictlis a command-line tool provided by Apple, specifically designed to create virtual network interfaces between Mac and iOS devices. This tool allows us to monitor iOS device network traffic in real-time.
Step 1: View Network Interfaces on Mac
Before creating a virtual network interface, let’s first examine the current network interface status on your Mac computer. This step helps confirm whether the virtual interface we’ll create later is successfully established.
Execute the following command to list all available network interfaces:
ifconfig -l
You’ll see output similar to the following:
lo0 gif0 stf0 anpi1 anpi0 anpi2 en4 en5 en6 en1 en2 en3 ap1 en0 awdl0 bridge0 utun0 utun1 utun2 en7
Explanation: These are all the network interfaces currently on your Mac. When we successfully create a virtual interface later, you’ll see a new rvi0 interface appear in this list.
Step 2: Query iOS Device UUID
To create a virtual network interface, we need to obtain the iOS device’s Unique Identifier (UUID). This UUID is a unique identifier for each device, which the rvictl tool requires to establish the correct connection.
Follow these steps to obtain your iOS device UUID:
Step 1: Connect Device
- Connect your iPhone or iPad to your Mac using a USB cable
- Ensure the device is unlocked and trusts this computer
Step 2: Open Xcode
- Launch the Xcode application
- From the menu bar, select Window ➜ Devices and Simulators
Step 3: View UUID
- Find your iOS device in the left device list
- Click on the device name, and detailed information will appear on the right
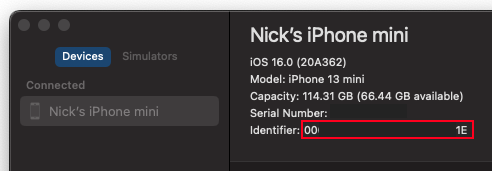
- Copy the UUID from the Identifier field, as shown in the image below

Tip: The UUID is typically a long string composed of numbers and letters, for example:
00008030-001E24E02188002E. Please copy this UUID as we’ll need it in the next step.
Step 3: Create Virtual Network Interface
Now we’ll use the rvictl tool to create a virtual network interface. This interface will serve as a bridge between your iOS device and Wireshark.
Execute the creation command:
Replace the UUID in the command below with the actual UUID you obtained in step 2:
rvictl -s 00xxxxxx-xxxxxxxxxxxxxx1E
Common Troubleshooting
If you encounter the following error message after running the command:
bootstrap_look_up(): 1102
Starting device 00xxxxxx-xxxxxxxxxxxxxx1E [FAILED]
This usually indicates that the system service com.apple.rpmuxd has not yet started. Please follow these troubleshooting steps:
Step 1: Check service status
sudo launchctl list com.apple.rpmuxd
Step 2: If the service hasn’t started, execute:
sudo launchctl load -w /Library/Apple/System/Library/LaunchDaemons/com.apple.rpmuxd.plist
Verify Creation Results
After successfully creating the virtual interface, run the network interface query command again:
ifconfig -l
You should see a new rvi0 virtual interface added:
lo0 gif0 stf0 ... en10 rvi0
Congratulations! Seeing rvi0 indicates that the virtual network interface has been successfully created, and we can now begin monitoring your iOS device’s network traffic.
Step 4: Use Wireshark for Packet Capture
Now that the virtual network interface has been created, we can begin using Wireshark to monitor and analyze your iOS device’s network traffic.
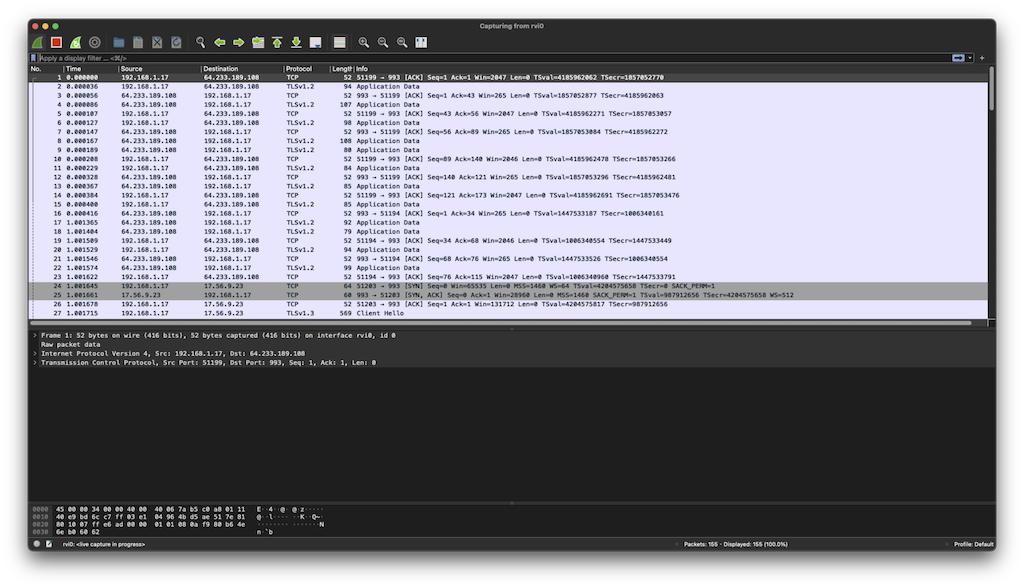
Launch Wireshark and select interface:
- Open Wireshark application
- Start Wireshark (if not yet installed, please download from the official website first)
- Select monitoring interface
- In the interface list on the main screen, find
rvi0 - Click
rvi0to start packet capture
- In the interface list on the main screen, find

- Begin monitoring
- Once you’ve selected the
rvi0interface, Wireshark will begin displaying all network activity from your iOS device in real-time - You can see all packets entering and leaving the device, including HTTP/HTTPS requests, DNS queries, etc.
- Once you’ve selected the

Useful Tips:
- Use Wireshark’s filtering features to focus on specific types of traffic
- You can filter by IP address, port, protocol, etc.
- For HTTPS traffic, although the content is encrypted, you can still see connection destination addresses and timing information
Step 5: Clean Up Virtual Network Interface
When you’ve completed your packet analysis work, remember to clean up the virtual network interface you created. This step frees up system resources and keeps your system tidy.
Remove virtual interface:
Use the following command to delete the virtual network interface (replace the UUID with your actual device UUID):
rvictl -x 00xxxxxx-xxxxxxxxxxxxxx1E
Verify removal results:
Execute ifconfig -l to confirm the rvi0 interface has been removed from the list:
ifconfig -l
If cleanup was successful, you should no longer see the rvi0 interface appear in the network interface list.
Summary
Through this tutorial, we’ve completed the entire iOS network packet capture process. Compared to the Android platform’s complex root permission setup requirements, iOS packet capture is relatively intuitive and secure.
iOS vs Android Packet Capture Comparison
iOS Advantages:
- No need to root or jailbreak the device
- Uses officially provided
rvictltool, safe and reliable - Simple setup process, only requires a few steps to complete
Android Challenges:
- Usually requires root permissions for deep packet analysis
- Setup process is relatively complex, requiring more technical background
If you also need to handle packet capture on Android devices, we recommend referring to our other tutorial: How to Capture Network Packets on Android.
Real-World Application Scenarios
Network packet analysis plays a crucial role in modern software development:
IoT Development: When multiple smart devices need to work together, packet analysis helps you quickly identify communication issues.
App Development: Whether it’s API call failures, connection timeouts, or data transmission anomalies, packet analysis can help you find the root cause.
System Integration: In complex system integration projects, packet analysis provides the most direct problem diagnosis method.
Practical Advice
Packet analysis is the most honest debugging tool - it won’t lie or hide problems. For IoT integration, multi-platform communication, or troubleshooting mysterious network issues, the Wireshark + rvictl combination is a developer’s best friend. When log files can’t provide enough information, packet analysis often gives you the most direct answers.
Reference Resources
Enjoy Reading This Article?
Here are some more articles you might like to read next: